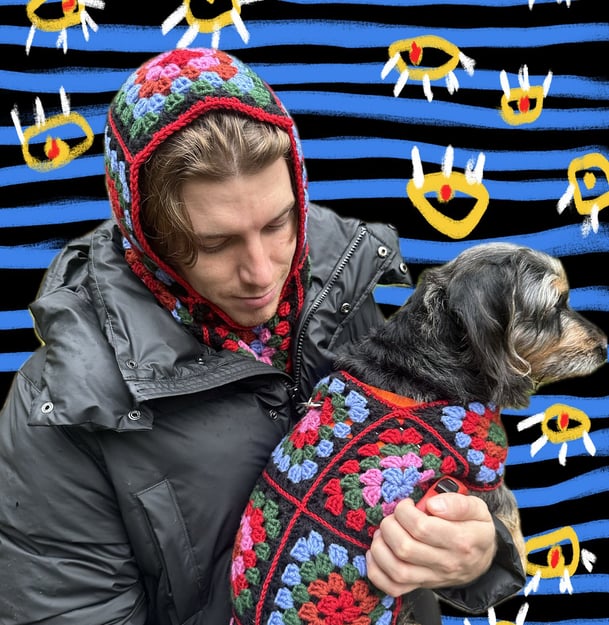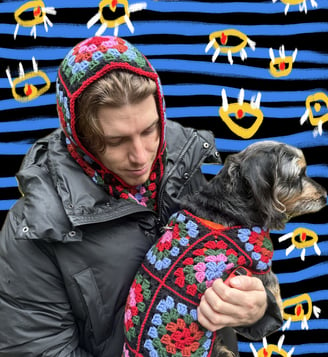
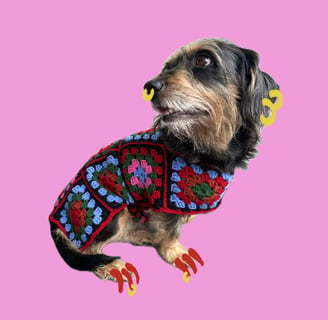
If you are reading this post, most likely you are crazy about your little bestie too (or you are kindly making a gift for someone who is), so you will understand me when I say THIS IS THE CUTEST THING I'VE MADE, so far at least. Dora and I (yes, she is the main character of the whole idea) received so many amazing compliments and looks! The energy of this crochet granny square balaclava and granny square pet sweater duo is unmatched. Enjoy 🖤
Let's Start
Easy. I wrote this pattern with crafty cuties in mind who might be beginners in crochet or like crochet patterns with detailed explanations and pictures. So, if you are a cutie with experience who goes straight to the point, a shorter pattern version is available here.
Difficulty
Supplies
Yarn: I used DK yarn*
Hook: I used4mm
Stitch Markers (optional)
Scissors
Yarn Needle
* Feel free to use any yarn depending on your preferences (perfect project to use your scrap yarn). My advice: Check if it's not scratchy, as your pet might not love to wear it. And here's a dog mom pro tip—make sure it is washable if your pet loves puddles, hehe. Before committing to yarn, you can always buy one skein, do a granny square test, and see if your bestie loves it. Dora slept on the granny squares I made for her; that's how I knew she would wear it with love.
Pattern Notes
Chain 3 does count as DC in this pattern.
Granny Squares are worked on the right side only, meaning we do not flip or change sides while crocheting.
You can transform the Granny Square into any other crochet square.
Tip to save time on sewing: If you don't want to sew granny squares, join them as you go! (I don't have a tutorial on that yet, but I'm pretty sure YouTube is full of tutorials on how to do it
If you've used different textures or yarns, it might be helpful to block them beforehand to ensure your squares are even when you seam them together
Be sure to do a swatch test to get the sizing right
Abbreviations
ch – chain stitch
sp - space
dc – double crochet
sl st – slip stitch
st(s) – stitch(es)
blo -back loop only
Granny cluster (3 dc cluster) - set of 3 double crochet stitches, all worked into one stitch or space
Measurements
I used 8 granny squares. Each granny square is 15x15 cm (5.9x5.9 inches). The balaclava comes quite spacious, as I wanted it to fit more like a hoodie than a hat (hathoodie?)
Balaclava
Want to make it bigger or smaller? It's simple! If you want to make it bigger, just add a few rows to your granny square; if you want to make it smaller, take a few rows out!
Not sure how to measure the perfect size for you? Before your project transitions from granny squares into a balaclava, laid flat, it will look like this: One granny square on the top of the pyramid will be right on the top of your head, three middle granny squares will go from your ear to ear, and four bottom granny squares will go around your neck.
Measure your head, keeping the tape as loose or as tight as you want your balaclava to fit. Now that you have your measurements, divide them by the number of granny squares that will go into the specific row. For example, if you measure the back of your head from ear to ear (or cheekbone to cheekbone if you want more coverage for your face) and divide that number by three (because that is how many squares will go for your head's width), you will get the perfect granny squares' size for the head's width. You can measure each row like that. If you get different sizes of granny squares, just take the average or choose the most important measurement for you.
Bestie Sweater
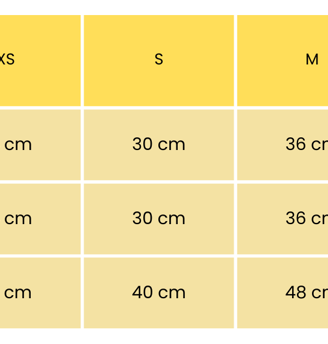
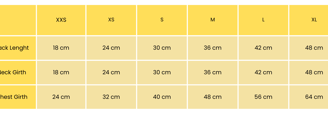
*These are sweater measurements. Please measure your bestie before crocheting. Leave a few cm from the tail
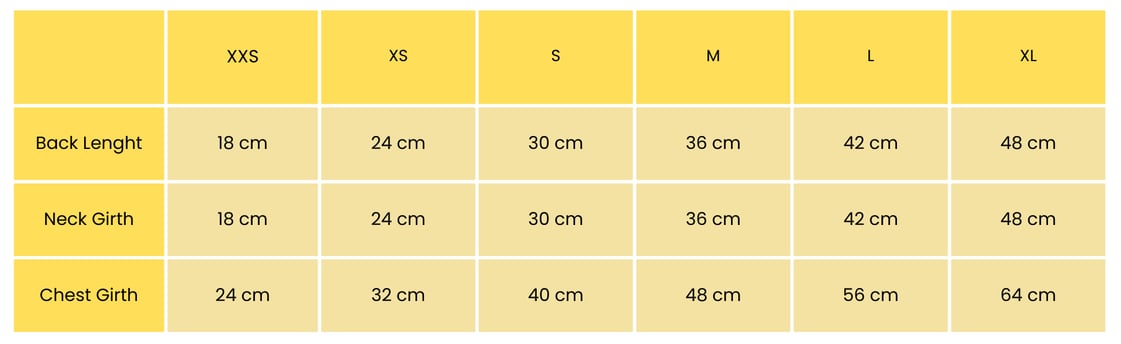
XXS: You'll need 12 granny squares, each sized 6x6cm
XS: You'll need 12 granny squares, each sized 8x8cm
S: You'll need 12 granny squares, each sized 10x10cm
M: You'll need 12 granny squares, each sized 12x12cm
L: You'll need 12 granny squares, each sized 14x14cm
XL: You'll need 12 granny squares, each sized 16x16cm
What size and how many granny squares you'll need?
Measurement Tips
If the measurements in the table are not suitable for your bestie, feel free to adjust them accordingly. For example:
If your pet's chest is smaller or bigger, customize the size of the granny square that will go on the chest. I made 1 slightly bigger granny square for Dora because her chest is larger than usual.
If your pet's body is longer or shorter, feel free to take out or add extra granny squares for length.
If your pet's neck is wider, you can add an extra granny square for the neckline.
You can also make it from smaller granny squares and use 4 rows instead of 3. Just double-check how big your one granny square has to be by dividing your pet's measurements by the number of granny squares in the row needed
As you probably guessed, you'll need some granny squares... Let's start
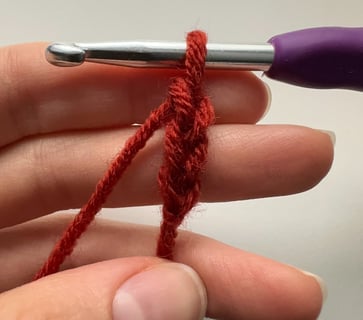
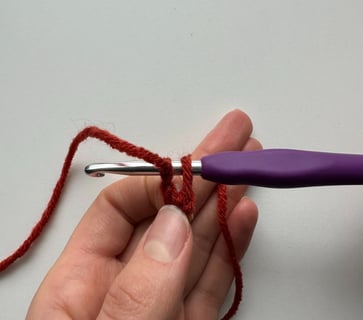
Chain (ch) 3. Insert your hook into the first chain stitch. If you pull on the chain, you should get a little smile.
Make a slip stitch to join the chain stitches into a circle (or a donut). Hold the circle with your thumb to make it easier for you to see where to work. We will use the same color for round 1.
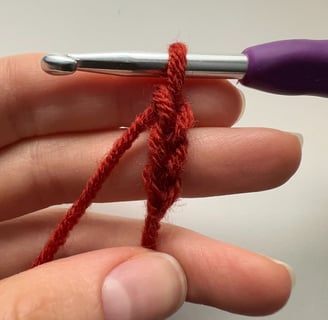
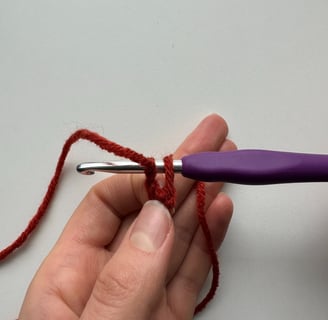
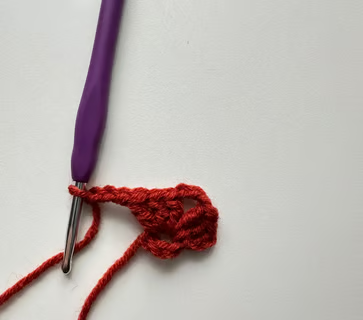
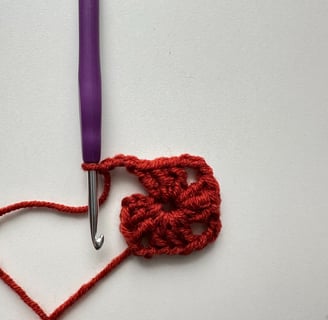
Ch 3. This counts as the first double crochet (dc) stitch of the first dc in the granny cluster
Work 2 dc into the center of the ring. Now you should have your first 3 dc cluster. Chain 3.
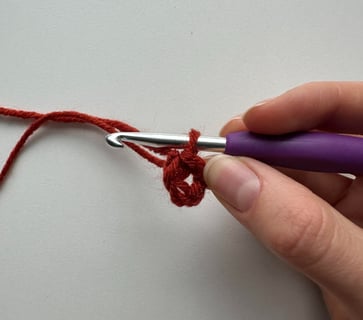
Make a second 3 dc cluster into the center of the circle and chain three.
Make a third 3 dc cluster into the center of the circle and chain 3
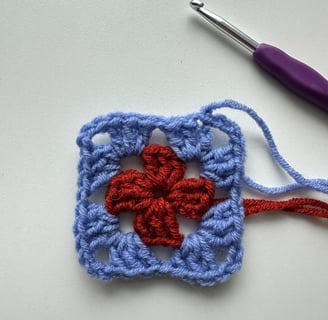
Make a fourth 3 dc cluster into the center of the circle and ch 3. It will be our last 3 dc cluster for this round. You should see a little square forming.
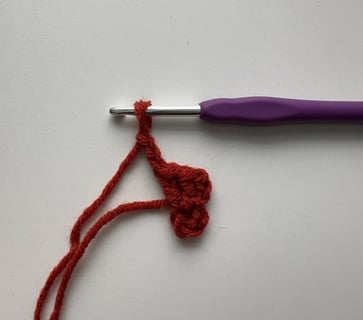
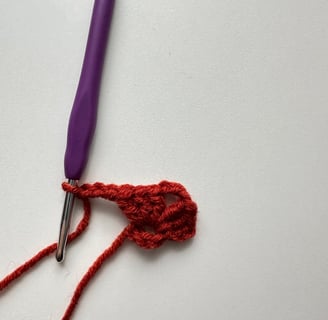
To finish the first round, slip stitch (sl st) into the top of the first ch-3. Ch 1, cut your working yarn, and pull it through your last stitch. Time to change colors!
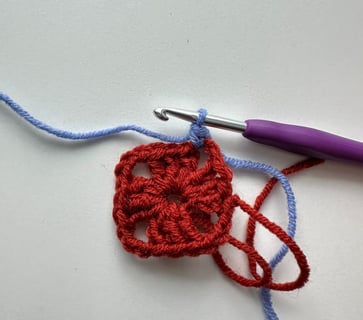
Change yarn. Make a slip knot and slip stitch into your chosen corner (this counts as chain-1). I would recommend starting in a different corner, so when you sew in the ends, they wouldn't all be in the same line.
Ch 3 (as slip stitch is acting like ch-1). This counts as the first dc and ch-1 space.
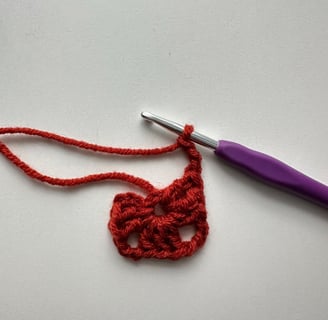
Make a 3 dc cluster in your first corner (first ch-3 space). Ch 3.
Make one more 3 dc cluster in your first corner. Chain 1. Repeat it two more times into the following corners.
In the fourth corner, make 3 dc, ch 3, and 2 dc (that ch of 4 acts as our third dc).
To close round 2, join ch-4 with a sl st to the 3rd chain of the beginning chain stitches.
Ch 1, cut the working yarn, and pull it through your last stitch
Make a circle
Round 1
Round 2
Round 3
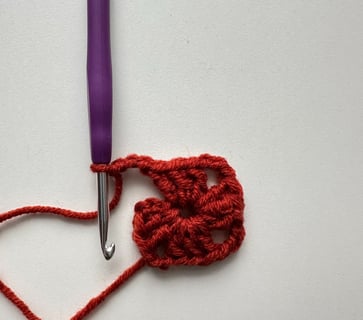
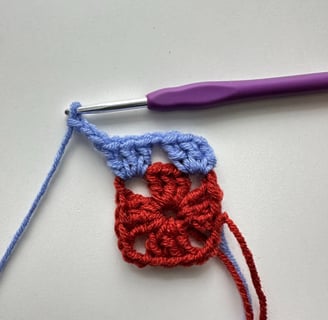
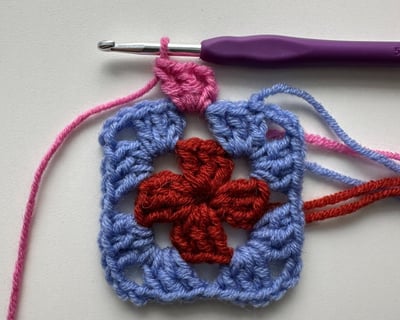
Change colors. Make a slip knot and slip stitch into the ch-1 space (space between two clusters). This will count as ch-1.
Ch 2 more (this will count as the first dc).
Work 2 dc in the same space, and you will get your first cluster of the round 2. Ch 1.
Work 3 dc into the corner. Ch 3. Work 3 more dc into the same corner. Ch 1.
Work 3 dc into the ch-1 space (space between two granny clusters).
Repeat the steps above until you reach the first cluster.
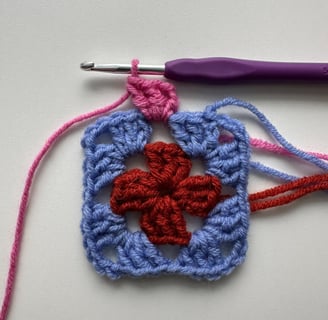
Join with a sl st to the top of the starting ch-3. Chain 1, cut the working yarn, and pull it through the last stitch.
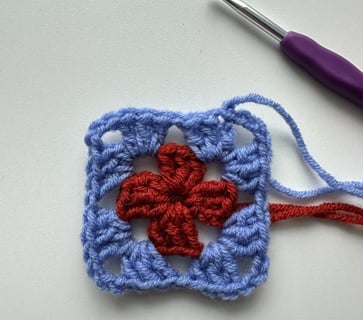
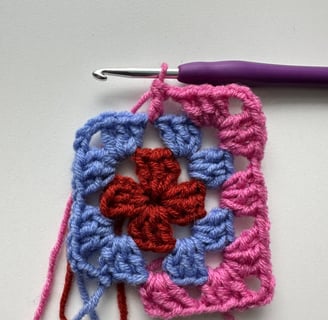
Make as many rounds as big as you want your balaclava to be
Finishing the Granny Square
When you finish crocheting your granny square, weave in all the loose yarn ends with a yarn needle


Seaming
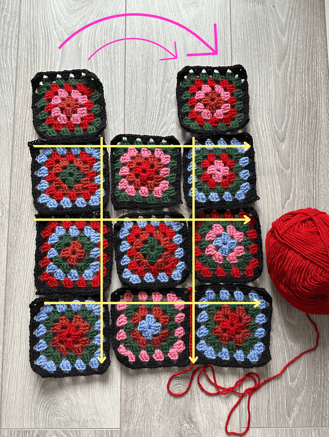
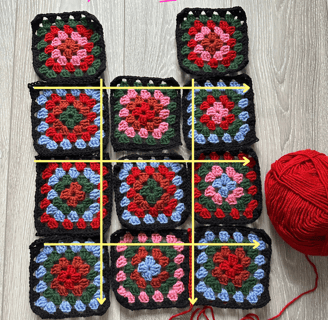
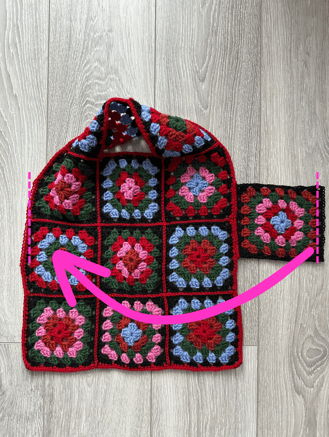
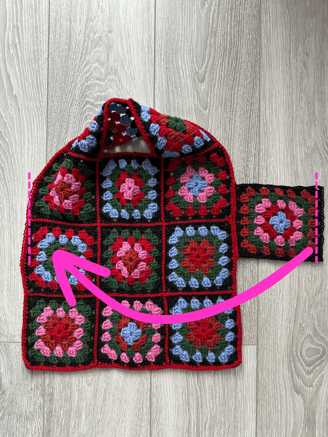
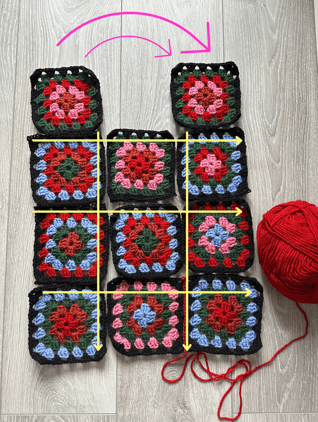
When all granny squares are finished, separate them into two groups – one for you and one for your bestie (to avoid any mistakes). Lay them flat as shown below.
Arrows indicate how we will connect the squares. Do not skip pink arrows as they mean that these squares also have to be connected were shown.
Flat seam
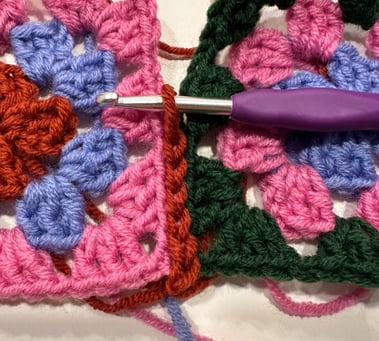
The flat seam is the flattest (as you could guess from the name) and, in my humble opinion, the easiest joining seam. To add extra spiciness to your balaclava and sweater, you can create flat seams using a different color (that's why I used red for my design)
Lay your granny squares facing right side up.
Make a slip knot.
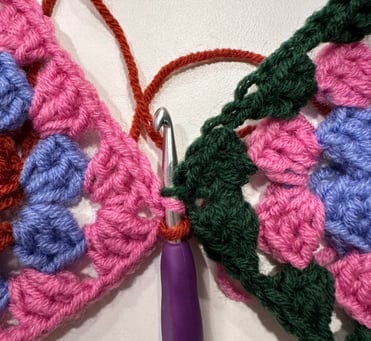
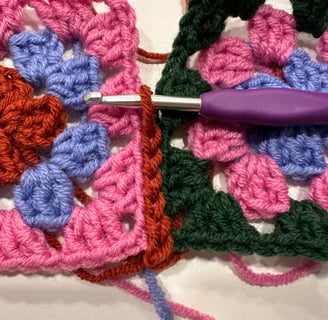
For this seam, we'll use the back loop only (blo). Insert the hook into the right granny square corner (ch-2) blo.
Make sure your yarn stays behind at all times.
Insert the hook into the left granny square corner (ch-2) blo.
Yarn over and pull the yarn through both loops, making the first slip stitch
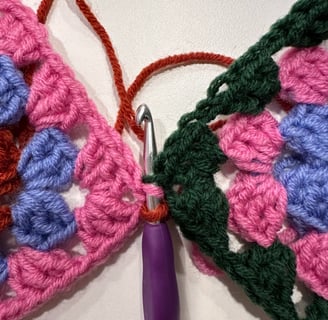

Next, put the hook through the following back loop only (blo) on the right side, then repeat it on the left.
Yarn over and pull the yarn through.
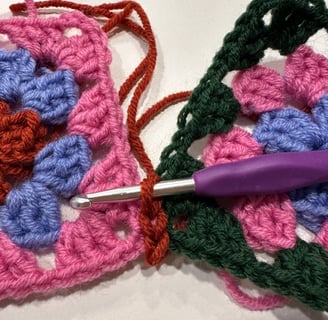
That's it! It is that easy. Simply slip stitch through two back loops of both squares at the same time. Repeat it until you connect all granny squares, as shown above
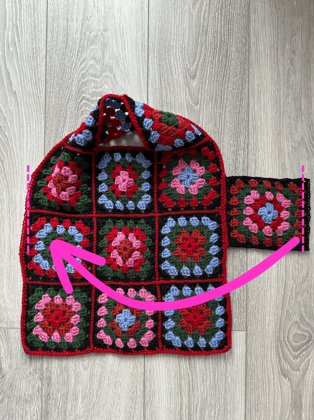
Pet Sweater's Layout
Balaclava's Layout

That's it! You have your cutest matching set! After you connect all granny squares, you can single crochet around the corners for a neater look and block them if needed! If these are your first projects, I know you might have some questions, so feel free to drop me a message! 🖤
A shorter version for more experienced crocheters
Okay, the granny square is almost the most popular and beginner-friendly crochet pattern, so if you skipped to this section, I'm pretty sure you know what to do. In case you need a reminder, I'll write a quick pattern below. But before...
... If you skipped through sizing info, no need to go all the way up; you can find it here
Granny Square
Ch 3, join with sl st to form a ring
Rnd 1. Ch 3 (counts as dc), 2 dc in ring, ch 3, [3 dc in ring, ch3] 2 more times. Join with a sl st in 3rd ch of 3. Fasten off.
Rnd 2. Join yarn in any ch-3 space. Ch 3 (counts as dc and ch-1), [3 dc in next ch-3 sp, ch-3, 3 dc in same sp., ch 1] 2 more times, 3dc in next sp, ch 3, 2 dc, join with sl st in 3rd ch of ch-3. Fasten off.
Rnd 3. Join yarn in any ch-1 sp. Ch 3, 2dc in same sp, ch 1, [3dc in ch-3 sp, ch 3, 3dc in same sp, ch 1, 3dc in next ch-1 sp, ch 1] 2 more times, 3 dc in last corner, ch 3, 3dc in same sp, ch 1, join. Fasten off.
Repeat as many rows as big as you want your granny square to be.
Seaming
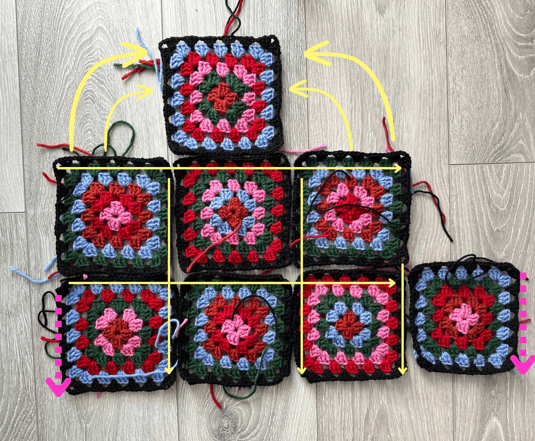
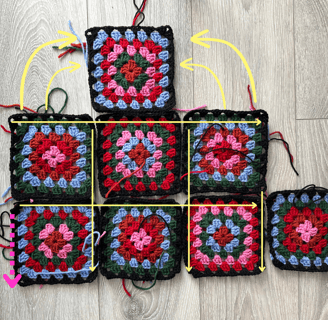
Use flat seam to join your granny squares. Join squares as shown below. Do not skip pink arrows as they mean that these squares also have to be connected were shown.

Balaclava's Layout

Pet Sweater's Layout
And that's it! You've made your matching set! You can single crochet around for a neater look, block them if needed, and you're ready to be the cutest besties in the park ❤